This is based on skirt #112 from the January, 2009 issue of Burda WOF as it then was. For some reason, even though the pattern is more than a year old, it didn't get reviewed a lot until very recently. As of this moment, there are 7 reviews on PR (mine to come shortly) plus Christa's review of related skirt #113. It's a winner!
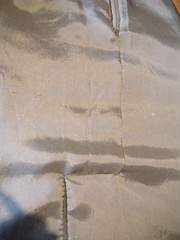
However, I Frankenpatterned the skirt - only the waist pieces come from Burda - the rest is a version of my PMB (PatternMaster Boutique) princess seamed skirt. My shape doesn't do well with a 2 seamed pencil skirt because there are 2 sizes difference between my waist and hip measurements, plus I have (ahem) "athletic" thighs. Trust me - plain skirt patterns and my lower half do not play well together. The princess seams, on the other hand, provide plenty of opportunities for subtle shaping including pegging the hem. I think I'll be making some version or other of this skirt for the rest of my days.
My first step was to muslin the waistband pieces. This has plenty of places for fit alterations too - since it comprises a total of 8 pieces. I found it fit at the waist, but was a little too exaggerated above the waist at the side seams and side-back seams, and a little too snug as it flared to go over the hip. My goal was to have the waistband follow my shape and not be tight anywhere. The needed adjustments were easy.
Once I had altered these pieces I did the necessary changes to my PMB pattern. This mostly involved moving the princess seams so they would intersect the seams in the waistband.
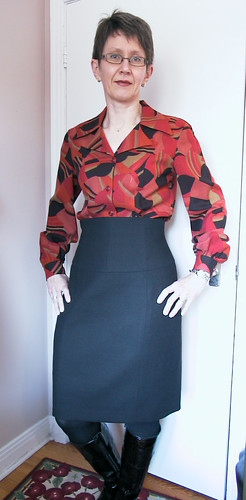
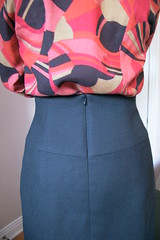
Then I made a muslin of the skirt to check that the fit was as good as expected. Imagine how chuffed I was to realize that my working out (with a personal trainer) since September is paying off - I had to take it in quite a bit. The muslin also let me check the length. This one is shorter than most of my other skirts, at 57cm (about 22.5") below the waist. It hits me just above mid-knee.
I already mentioned I was going to bone the waistband. Actually, I decided to go all couture and create an inner structure or corset to hold the boning and give structure to the entire waistband, underline the skirt with silk organza, and fully line it with Bemberg, including a properly-finished back vent.

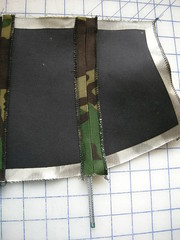
This inner corset thingy was then basted to the constructed lining at the top and centre-back. The lower edge hangs free. If I ever decide that the boning is too much, I'll easily be able to remove it.
Below is a photo of the lining with corset attached.
Construction of the skirt itself was uneventful. There are only a couple of things to note. I used Italian black wool crepe (acquired for a song at the Fabric Flea Market, 2009). I interfaced the waistband but with a light and lofty type of fusible. This is more for cushioning the fairly thin wool crepe over the skirt innards than for actual structure.
The skirt pieces I underlined with silk organza. I find this provides a little crispness to a wool crepe skirt. It means the skirt will crease less and that creases will fall out faster. Further, having underlining means you can sew a hem and vent which are truly invisible because all the stitches holding them in place are in the organza only and don't touch the fashion fabric.
I used a long invisible zipper since a standard skirt-length zip would have been too short given the high waist. I left it a generous length (28cm or 11") and this makes such a huge difference in terms of ease of getting into and out of the skirt that I may always do it in skirts from now on.
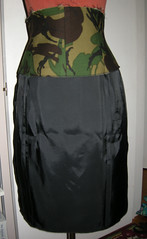
In attaching the lining to the skirt at the waist and zip, the lining/corset layer is treated as one (just as if it was only lining).
At the hem there is a vent at CB which I lined "properly".

Notice as well that I pressed back the edge of the vent underlap, and that the overlap is mitered at the hem.
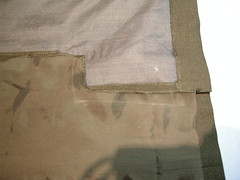

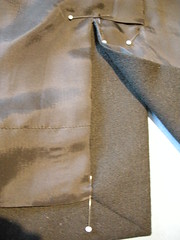
Then invisibly hand-sew the lining to the vent edges, and across the top of the vent.
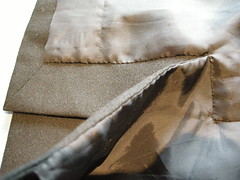

In the final picture you can see the little bubble of extra length, just above the top of the lined vent.
And here are some more photos of the finished skirt:


And last but not least: With the famous Orange Plaid Jacket!
This skirt should make a very versatile addition to The Sewing Lawyer's wardrobe - so far (judging by the fact I've been sitting in it while I wrote this blog entry) it's comfortable as well as (if I do say so myself) rather good-looking.
No comments:
Post a Comment