They say, with good reason, that when sewing you should spend almost as much time at the ironing board as at the sewing machine. A garment whose seams, darts and edges have not been properly pressed just screams "homemade", and not in a good way.
So I thought I'd show you my pressing equipment.
Until about 10 years ago I sewed with the help of what I thought was a pretty good iron - a T-fal. Since acquiring my first "serious" iron, a steam generator, however, I've never looked back. Having a great iron and learning how to use it, and some specialized pressing equipment, kicked my sewing up to a higher level.
Pictured to the right is my Euro Pro steam generator iron. This iron is no longer made. Other brands now available include Reliable, Rowenta, and DeLonghi. There are probably lots more. I paid about $300 for my Euro Pro and it's about 5 years old.
The downside of a steam generator is that it takes longer to get to full heat, and it draws a lot of power. This is because you are heating the water in the tank, as well as the sole plate of the iron. Once it's up to full heat, you have unlimited steam until the tank is empty. Unlike a household iron, the iron does not steam when you hold it horizontal; rather it steams when you press the button at the front end of the handle. On my Euro Pro you can lock the steam button down, but I always found it better to press the button only when I needed the steam.
I had an ironing crisis one day about a year ago when the Euro Pro would not turn on - it needed a new switch. In the meantime, I needed an iron! I headed to Cornwall, Ontario, to Giroux Sewing Centre, after realizing they could fix my iron, and that they sold gravity feeds.
I bought a Consew Silver Star ES-300 which is now my sewing room workhorse. My Euro Pro is relegated to back-up. The gravity feed system relies on the flow of water from a plastic bottle to the hot iron. It is a lot heavier than the iron part of the steam generator, about 5lbs. It heats up as quickly as a standard household iron.
I love the shape of it - low and sleek. The button on the handle is the steam control.
Here you can see how I've attached a hook to keep the tubing which carries the water and the cord out of the way.
Unlike the steam generator, the gravity feed iron produces steam when the water hits the heated sole plate. They say the steam from the steam generator is drier than the steam produced by the gravity feed. I'm not sure I notice. What I do notice is that because cool water is hitting the hot sole plate, my gravity feed cannot steam continuously the way the steam generator can. But that's OK - I like my steam in short bursts anyway.
These irons only have a few holes for the steam, near the iron's point. This is not a problem - you give it a burst of steam, and then use the dry iron to flatten the fibres.
A final point about my iron - it came with a teflon sole plate and I use it all the time.
Now for the ironing board - I have a Reliable C81 Vacuum & Up Air ironing board. This expensive item is an extremely sturdy board with a built in heating element and a fan. The fan can run in 2 directions - down, which pulls the steam through the fabric and cools the piece quickly, or up, which creates a cushion of air you can iron delicate fabrics on. I'm not 100% sure why it has a heating element (to ensure all the steam drawn down inside evaporates, perhaps?) but the fan is great for tailoring or sewing with wool.
Next up are my pressing tools.
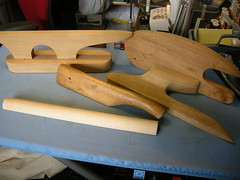
I have a good selection of wooden pressing tools which you can see in the next picture.
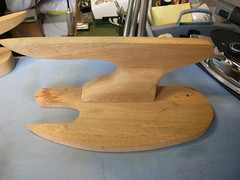
At upper left is my Dritz point presser and clapper (they call it a "pounding block"). At upper right is my tailor board (made by my husband). In the middle is an antique mallet of some kind which can double as a really menacing clapper, and in front is a wood seam stick.
One uses wood because it gives a very hard and flat surface for flattening seams - the clapper is for convincing the wool to STAY flat!
Of these tools, the most-used is my tailor board. Here is is with its straight side up. Both sides have a point presser. These are great for pressing open the seam attaching the facing to the jacket front and lapels, or the upper and under collar. The narrow wood edges are easy to get into fairly confined spaces.
I also use the seam stick a fair bit - it's essentially a dowel with a flat side so it doesn't roll around. Pressing a long straight seam open against the seam stick avoids any risk of the seam allowances imprinting on the garment, since the curved edge means that if you press on the stitching line, there is essentially no pressure between the iron and the seam anywhere else.
Then there are the hams. These are all commercially-made. The long sleeve roll to the left is very good for inside any tubular item - sleeves and pants. It does the same kind of job as the seam stick but is softer.
The standard shaped ham is very good for pressing open seams with a curve, such as at the hip, or for darts. It basically gives you a curved ironing board so you don't flatten the shape that has been stitched into the garment.
The PresMit is much softer. You slide your hand into the pocket (you can see the edge of it below the label), and then you can place your padded hand right inside a garment (i.e. inside the shoulder) and press against your hand, without burning yourself. I inherited this specimen from my sewing grandmother, along with her Featherweight and a few other choice items.
You can also make your own pressing hams. I made the strangely-shaped one pictured here. I wish I could remember where I found the pattern - perhaps in an old issue of Threads? The idea of this one is that it has a number of different curves, and you can even use it to press open a fish-eye dart since the curves of the ham (sort of) have a waist indent. I made this so long ago I cannot remember if it is a double-layer casing, but I suspect it is since it hasn't lost any stuffing. On the subject of stuffing, I used sawdust, and could have used more - it's a little on the soft side.
Finally in this picture, you can see two tools for pressing velvet (not that I've actually made a velvet garment) - a velvet board approximately 4"x8" (10x20cm) and a generous piece of mohair velvet upholstery fabric. I picked up the velvet board at the Fabric Flea Market which is why it's so full of lint - I guess its previous owner made a ton of items from cotton velveteen in all colours.
And then the silk organza press cloth - I just cut off a generous rectangle and serged the edges. It's terrific because you can see through it.
If I ever make any progress on my actual sewing, I'll show these in action. In the meantime if you have questions, post them in the comments.


No comments:
Post a Comment