Thanks to those of you who signed up to follow my blog (now at 209 210, woo hoo!), and for all the very nice comments on my last post!! Getting your comments and feedback is the nicest part of blogging so please keep them coming!
I was going to write a tutorial for how I finish a facing around a zipper. However, there are several excellent tutorials already illustrating this technique on
Sigrid's sewing tutorial site (which is a superb resource, if you don't already know it), so I decided not to reinvent the wheel.
In particular, I recommend
Sherry's clearly-illustrated tutorial. This technique can also be used to finish the top of any zipper opening. Kathleen Fasanella has published a great set of instructions for finishing a
lapped zipper and
centred zipper in the same basic way. Another variant is the faced fly front zipper - I shamelessly recommend
my own tutorial for that, which is also linked at Sigrid's site.
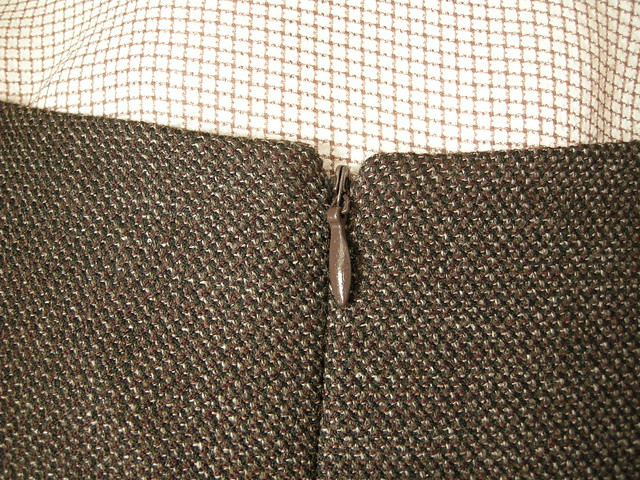
To the left, you can see how neat and clean the inside is, as a result of this easy technique.
The zipper looks as clean from the outside. This photo also shows the fabric from my sheath better. At least on my monitor, the colours are accurate. The fabric is slightly tweedy. It's got the extremely dark coffee colour of my leather jacket embedded in it along with a tan and a rich reddish brown. The fabric is a suiting weight wool, with a tiny bit of lycra (not useful in this sheath, since I underlined it with silk organza).

Here's another detail from my dress. Understitching at the neck and arm hole edges ensures that the lining never shows. (Topstitching does the same thing, but understitching is invisible from the public side of the garment.) If not understitched, the inner layer, especially if made from a light-weight fabric as here, would roll to the outside. Once understitched, the seam attaching the lining to the dress fabric naturally rolls instead to the inside, as you can see at left. Understitching is also great for a faced edge, since facings also tend to roll to the outside.
Understitching securely attaches the enclosed seam allowances to the inside layer. To understitch a curved edge like the neck or arm opening of my dress, first trim and grade the seam allowances. I'm not a fan of clipping because little corners may form where the clips release the tension. Trimming results in a smooth curve. If you trim aggressively (leaving about .7cm or .25", or even less) the seam allowance will easily stretch enough so that the edge won't pucker or refuse to press flat. If you are understitching, there is no reason to worry about the small seam allowances compromising the strength of the seam.
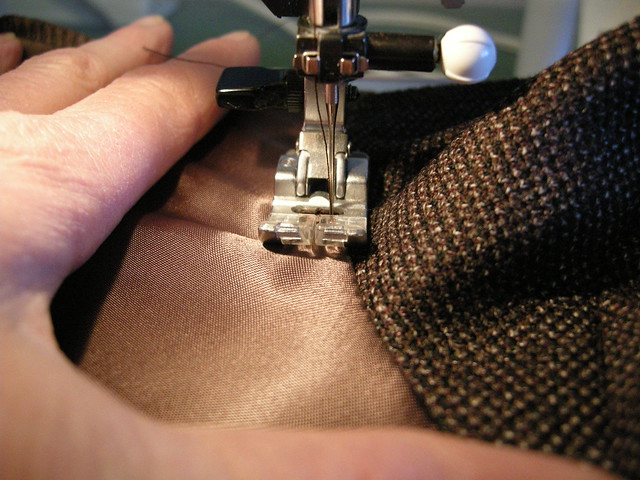
The secret of understitching is to keep the lining or facing as flat as possible on the bed of the machine, forcing the seam allowances underneath to stretch into the curve. Don't sew straight ahead. Instead, rotate the piece as you sew around the curve, keeping the stitches close to the seam (and checking to ensure that the seam allowances lie under the inside layer so they will be caught in your stitching). In the photo at right, as I sew I am spreading the lining flat with my left hand, and guiding it through the needle by rotating the garment clockwise. I do not press the seam at all before understitching. While sewing I keep spreading the lining away from the garment fabric to ensure the lining isn't folding over on itself. The goal is to ensure there is no distortion in the curve.

I used the triple stitch zig-zag on my latest sheath dress. This stitch really ensures that the trimmed seam allowances are well-attached to the lining. Of course it's a pain in the neck if you have to pull it out (ask me how I know!!). You can also understitch with a straight stitch, ordinary zig zag, or by hand if you are so inclined (as I apparently was when making my 2nd last sheath, shown to left).
If you don't already use this technique in your sewing, I highly recommend it!

No comments:
Post a Comment